
Creating Drawings in Python
This week we are learning how to create new shapes . We will draw images through coding using CMU Academy IDE (Integrated Development Environment). CMU CS Academy is an online, graphics-based computer science curriculum taught in Python provided by Carnegie Mellon University. They create novel, world-class Computer Science education forthe classroom —and it’s entirely free. You can sign up for it here: CMU CS Academy
Alternatively, To get started in Python, I also recommend getting PyCharm: https://www.jetbrains.com/pycharm/
In each blog post, I will go over some examples, creative tasks that i created, related code and summarize the key concepts and syntax we learned .
So let’s start with the Minion. This is how it looks like:

As you can see, the drawing consists of bunch of geometric shapes, layered on top of each other. Eyes are circles, yellow body section is actualy a big circle and rectangle, etc. Here’s the code:

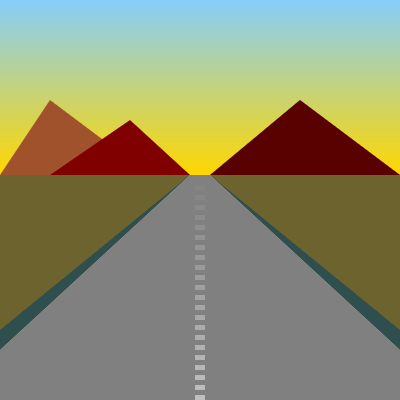
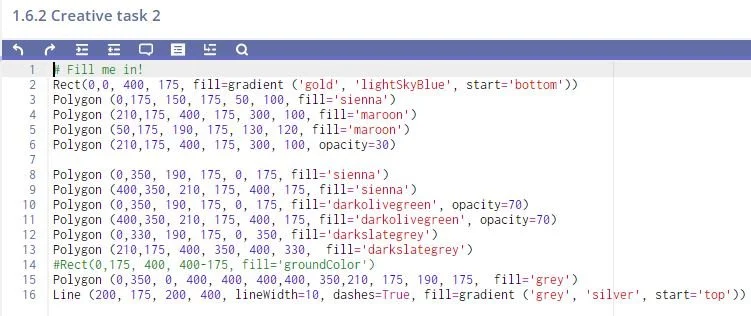
Another example: Drawing a road and landscape scene using Python shapes.
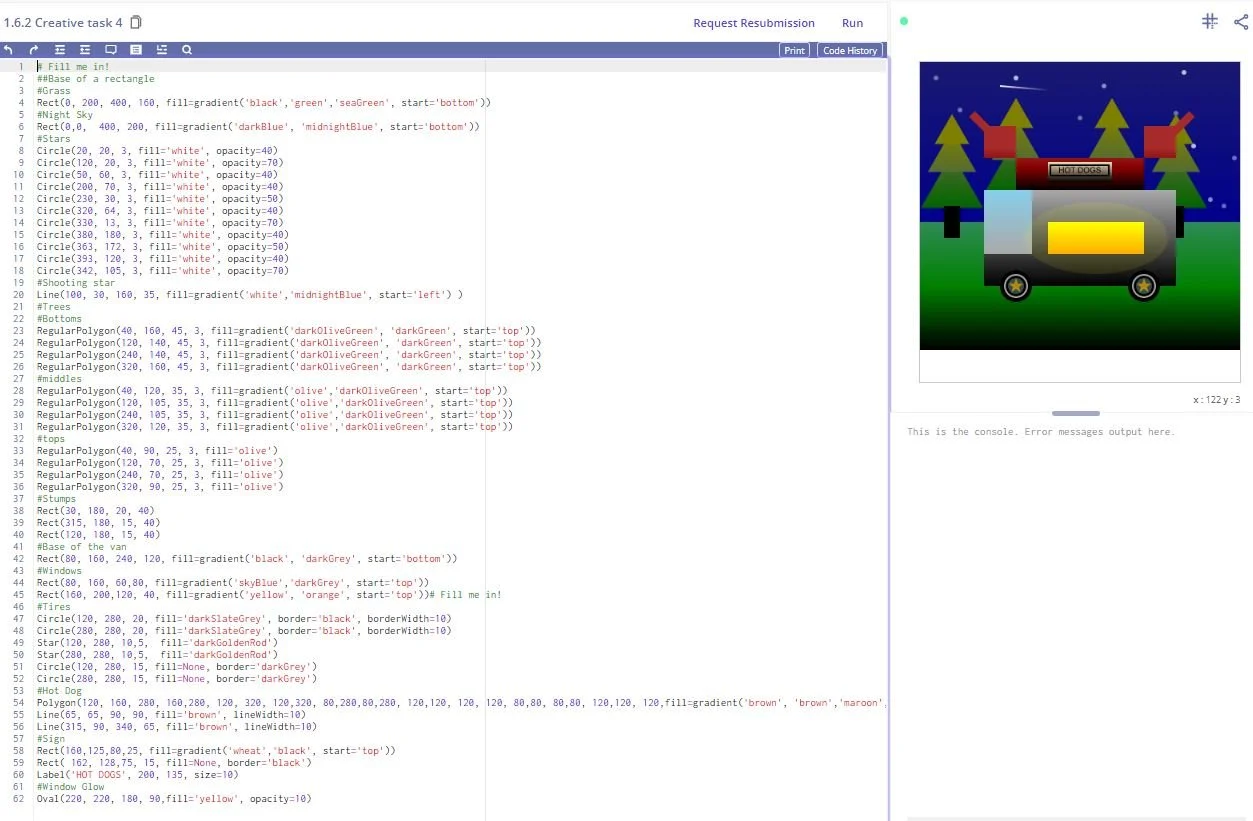
Here’s another example I created : A hot dog stand using Python shapes
Now that you have seen some examples, let’s cover some basics:
Position and Size
The canvas is 400 x 400
(x, y)coordinates refer to points on the canvasx values increase as you head right
y values increase as you head down
Rect(left, top, width, height)draws a rectangle
Colors
Fills and Borders
Fills
Rect(left, top, width, height, fill='green')draws a green rectangleThe fill argument is optional
The default fill is
'black'To not have a fill, set
fill=None
Drawing order:
Shapes drawn first are behind shapes drawn later
Borders
To draw a shape with a border, set the border property.
Ex. Draw a rectangle with a green border:
Rect(left, top, width, height, border='green')Now with a border width of 4:
Rect(left, top, width, height, border='green', borderWidth=4)The default border is
NoneThe default borderWidth is 2
Dashes
Dashes can be defined as True or False
Ex. Draw a rectangle with a dashed green border:
Rect(left, top, width, height, border=‘green’, dashes=True)Dashes can also be written as a pair of values
(dashWidth, gapWidth):Ex. To draw a rectangle with dashes of length 1 pixel and gaps of length 4 pixels:
Rect(left, top, width, height, border='green', dashes=(1, 4))The default dashes is
False
Colors and Gradients
Colors: find a list of color names here
To use rgb colors, use
rgb(red, green, blue)This lets you makes custom colors
Ex.
rgb(152, 255, 152)is mint green!The values for red, green, blue must be between 0 and 255 inclusive
Gradients
The default gradient is a radial gradient
This fades from the center of the shape outwards
It uses at least 2 colors
Ex.
gradient('red', 'green', 'blue')
linear gradient
This fades starting from one corner or edge of the shape to the other
Ex.
gradient('red', 'green', 'blue', start='left-top')
Opacity
opacity is the opposite of transparency
The values for opacity are between 0 and 100
The default opacity is 100 (completely opaque, completely hides shapes behind it)
A shape with an opacity of 0 is completely transparent
Shapes
Rectangle, Ovals, Circles, and Lines
Rectangles and Ovals
Rect(left, top, width, height)draws a rectangleOval(centerX, centerY, width, height)draws an oval
Circles
Circle(centerX, centerY, radius)draws a circle centered at (x, y)To the autograder this is the same as an oval with equal width and height
Lines
Line(x1, y1, x2, y2)draws a line from (x1, y1) to (x2, y2)Line(x1, y1, x2, y2, lineWidth=5)draws a thicker lineThe default
lineWidthis 2
Labels
Label('hello', x, y)draws a label centered at (x,y)Label('hello', x, y, size=20)use size to draw a smaller or larger labelLabel('hello', x, y, bold=True, italic=True)draw a bold and italic labelLabel('hello', x, y, font='monospace')use font to change the label's fontThe currently available fonts:
'arial','monospace'
Label(‘hello’, x, y, fill=None, border=‘red’)use fill and border as with other shapes
Regular Polygons and Stars
Regular Polygons
Regular polygons include: triangles, diamonds, pentagons, hexagons, and so on
RegularPolygon(x, y, radius, points)Ex: Draw a pentagon at (100, 100) with a radius 50:
RegularPolygon(100, 100, 50, 5)
Stars
Star(x, y, radius, points)draws a starEx.
Star(100, 100, 50, 5)draws a 5-sided star at (100,100) with radius 50Change the
roundnessto make the star more or less roundValues for
roundnessare between 0 ("spiky") and 100 (almost a circle)
Polygons
Create polygons by connecting points in order
Polygon(10, 60, 50, 20, 30, 90)connects (10, 60) to (50, 20) to (30, 90)
I hope this was helpful.
Till next post.
Alara